Improve your Health with Food
Living your best life includes paying attention to the food you put in your body. There is a wealth of information on the effects of sugar and other ingredients in food.
Make healthy choices - Cut the sugar!
Too much sugar in our diet accounts for a myriad of health issues, including fatty liver, obesity, heart disease, diabetes and some suggest Alzheimer’s. Look for ways to cut processed sugar – especially fructose – from your diet to improve your health.
Choose breads made from whole grains
Unlike white or wheat breads, whole grain breads include all three parts of the grain kernel — the bran, endosperm, and germ. The germ is the part that contains B vitamins. When buying bread, look for the term “whole grain” listed in the ingredients.
Eat quality fats
Check out these resources on the negative effects sugar has on our bodies:
Living your best life includes paying attention to the food you put in your body. There is a wealth of information on the effects of sugar and other ingredients in food.
Make healthy choices - Cut the sugar!
Too much sugar in our diet accounts for a myriad of health issues, including fatty liver, obesity, heart disease, diabetes and some suggest Alzheimer’s. Look for ways to cut processed sugar – especially fructose – from your diet to improve your health.
Choose breads made from whole grains
Unlike white or wheat breads, whole grain breads include all three parts of the grain kernel — the bran, endosperm, and germ. The germ is the part that contains B vitamins. When buying bread, look for the term “whole grain” listed in the ingredients.
Eat quality fats
- Grass-fed beef or pigs contain the good fat for our bodies, which is not typically found in stores.
- Butter can be a healthy part of your diet. It’s rich in nutrients like bone-building calcium and contains compounds linked to lower chances of obesity. Butter can also be part of a low-carbohydrate diet, which may help people better maintain their weight or lose weight quicker than they would with a low-fat diet. The beta carotene in butter can help your eyes, strengthen bones, and lower the chances of cancer.
- Olive oil contains monounsaturated fatty acids that help lower cholesterol. The anti-inflammatory and antioxidant properties of extra-virgin olive oil is associated with improving heart health and lowering the risk of cancer.
Check out these resources on the negative effects sugar has on our bodies:
- The Secrets of Sugar - the fifth estate - YouTube
- Pure, White, and Deadly: How Sugar is Killing Us and What We Can Do to Stop It
- Fat Chance: Fructose 2.0
- The Sugar Blues by William Dufty
- Is Coffee Healthy? By James Hoffman and Professor Tim Spector
- How to control blood sugar spikes by Glucose Goddess and Dr. Sarah Berry
Lettuce for Saving Seeds
The question was asked: How to save lettuce seeds? The Queensland non-hearting lettuce seeds have been saved/refreshed every year since 1990; upon return from Queensland, Australia.

As you can see by the picture, this plant showed up in the cracks of the backyard cement. I set the blue cooler on the picnic bench so that you could see the little yellow flowers better. The little flowers will come to bloom and then form fluffy seed heads. These can be picked one-by-one or let go for the entire plant to produce and then take and set aside to dry until ready to shuck and put into jars which I just keep in a cool place and mark from year to year.
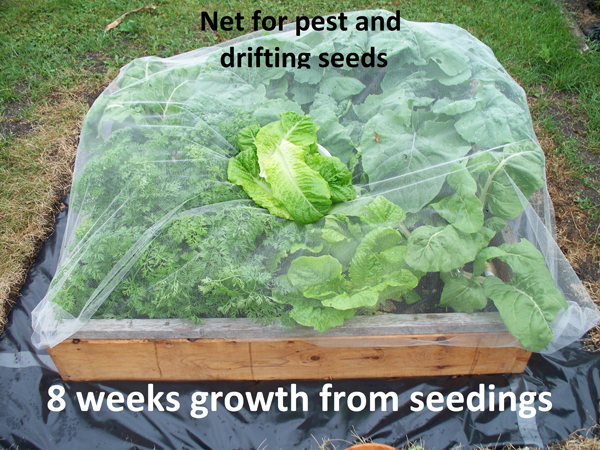
Ready to go: started some of last year's seeds a few days ago in vermiculite with shower bonnet cover to retain moisture and they are peaking through. I keep them for up to a week - as Mel would say, “when they have two true leaves.” And then time to pot and maintain for another 2-3 weeks before planting into a square foot garden space. That’s it!
Ready to go: started some of last year's seeds a few days ago in vermiculite with shower bonnet cover to retain moisture and they are peaking through. I keep them for up to a week - as Mel would say, “when they have two true leaves.” And then time to pot and maintain for another 2-3 weeks before planting into a square foot garden space. That’s it!
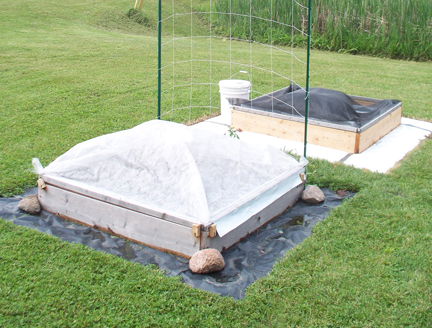
Life of Sweetie Sweet Corn in a 4'x4' Compost-made Garden
|
Corn planted and covered to keep out weed seeds and animals.
|
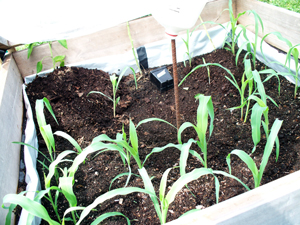
Let's take a look at this fast-growing corn.
|
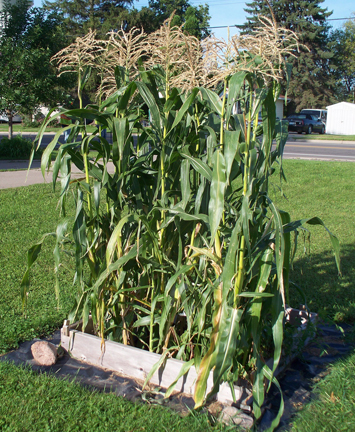
Mid-season growth.
|


|
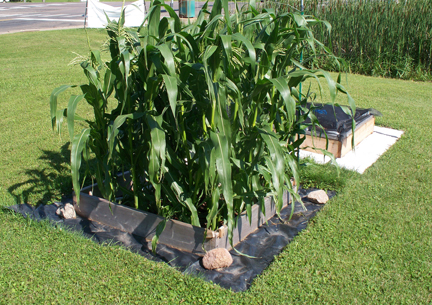
Animal damage... What should we do?
|
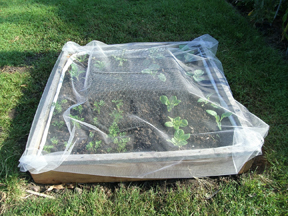
Net designed to enclose 4'x4' of corn.
|
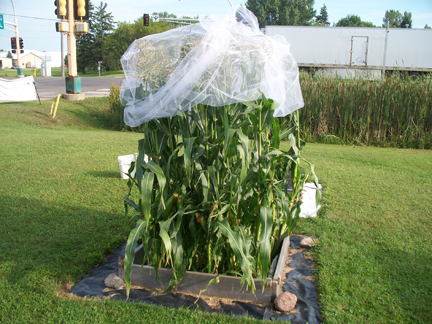
Totally covered and tied on bottom to keep out intruders including damaging insects.
|


|
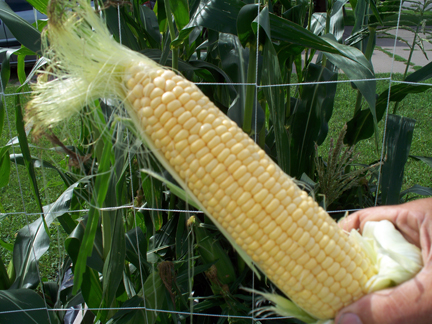
Ready to harvest.
|
A beautiful ear of corn.
|
Harvest continues, mostly 3 ears per stalk.
|

|
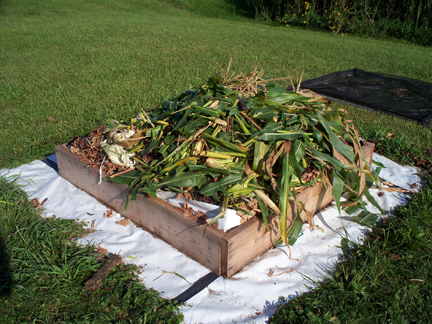
Compost as soon as you can after harvest.
|
Chopped corn interspersed with lots of leaves; then, topped off with more leaves.
|
Screen covered compost keeps all insects and critters out.
|
Annual Garden Planting Schedule for Central Minnesota
Fall: Spinach, Egyptian onion and garlic.
Early spring: Most Onion seeds by February 1.
Sprout in the winter months.
Mid-March nursery starts:
Peppers, eggplant, leeks, early "Copenhagen" cabbage, cauliflower, kohlrabi, mustard, greens.
Mid-April nursery starts:
Tomatoes, broccoli, celery, late "Flat Dutch" cabbage, cauliflower, purple kohlrabi.
Early outside planting after mid-April:
Peas, onion sets, carrots, cauliflower, cabbage, kohlrabi, mustard, and lettuce.
Late outside planting: Beets, parsnips, lettuce, cabbage plants.
Later outside planting:
Broccoli, endive, tomatoes, peppers, melons, celery, eggplant,
Pre-sprout corn, beans, squash, cucumbers.
Summer nursery starts (July 4):
Beets, Chinese cabbage, carrots, rutabagas, turnips, lettuce.
Late summer planting: Winter radish.
September planting: Radish, turnips.
Note for nurseries:
The new LED daylights work better than any other lights and at less cost.
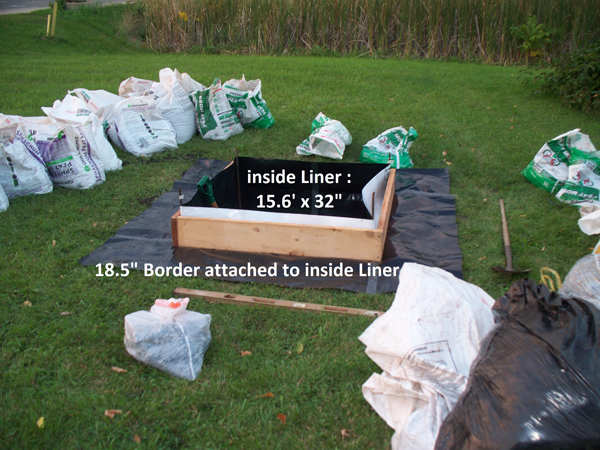
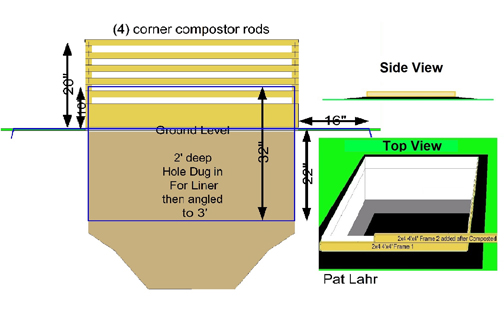
New Generation Yard Garden: Compost-Made 4’x 4’ Garden


Tools needed:
Plastic surround, shovels, buckets/sacks, wheelbarrow, four 3-foot stakes, (re-rod)
16 feet of 2” x 8” lumber for the base; 80 feet of 2” x 2” strips for top composter
Compost materials: leaves, grasses, coffee grounds, egg shells, kitchen waste.
Gardening World Wide will supply:
How to:
season. One 4’ x 4’ unit will always be composting, while the others are getting a new 6” layer of quality soil each year for weed-free nutritious vegetable gardening.
Plastic surround, shovels, buckets/sacks, wheelbarrow, four 3-foot stakes, (re-rod)
16 feet of 2” x 8” lumber for the base; 80 feet of 2” x 2” strips for top composter
Compost materials: leaves, grasses, coffee grounds, egg shells, kitchen waste.
Gardening World Wide will supply:
- Farm plastic surround cut to size from Feed Stuff Bagging, Waverly, 9 mil thick.
- Trailer to bring compost materials in and remove excess soils + transport machines.
- Backhoe, 13” bucket, to ease the work of digging 2 feet down into the 4’x 4’ space.
- Wide tire 4-wheeler to transport materials over your lawn to trailer.
How to:
- Build a 4’ x 4’ of 2” x 8” lumber to remain in place; twenty 2” x 2” four-foot lengths for movable above ground composting.
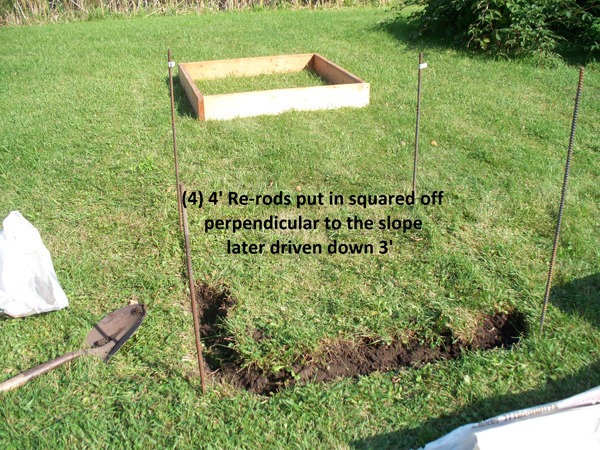
- Level the area by placing the frame in place and staking each inside corner up to 24 inches deep upon completion of the digging.
- Remove the frame, then dig vertically 24 inches surrounding the total inner perimeter of the 4’ x 4’, putting the removed soil into bags/buckets for disposal or on the trailer for removal. Work towards the center to remove soil, also making certain any soil left is weed-free!
- When sides are as true vertically as possible, place the plastic vertically held into the corners with the stakes, then setting the leveled frame in place with top 10 inches of the plastic to the inside of the frame. The attached plastic apron will lay flat on the ground surrounding the 4’ x 4’ to impede weed growth next to the unit and allowing for easy mowing. (Vertically insert the exterior 2-3 inches of the apron in surrounding ground upon completion of the unit. See picture.)
- Now you are ready to begin adding composting materials, layering all the different gathered materials. The natural heat of summer and the bacteria decomposing will get your materials hot in just a few days.
- Add the 2” x 2” lengths on top of the frame and continue composting until full; and then start saving materials for the next season. Moisten as necessary.
season. One 4’ x 4’ unit will always be composting, while the others are getting a new 6” layer of quality soil each year for weed-free nutritious vegetable gardening.
How to square foot garden
Copy arranged by Sharla Peterman based on the All New Square Foot Gardening by Mel Bartholomew.
A) Pick the location
B) The 3 Steps
A) Pick the location
- Avoid trees and shrubs due to roots and shade.
- Pick an area that gets 6-8 hours of sunshine daily.
- Have it close to the house for convenience.
- Area should not puddle after a heavy rain.
- Existing soil does not really matter since you will be planting above it.
B) The 3 Steps
- Build a box.
- Add Mel’s Mix of 1/3 compost, 1/3 peat moss, and 1/3 vermiculite.
- Add a grid & start planting
- Layout- Arrange your garden in squares, not rows. Lay it out in 4' x 4' planting areas. (Other arrangements can be used.)
- Boxes- Build boxes to hold a new soil mix above ground. Soil should be 6” deep so use boards that are 6-8” high. You can build 4’x4’ boxes, 3’ x 3’ boxes for kids, or any size that fits your area (but 4’ or less across.) If you want a movable or deck box, attach 1/2-3/4” plywood to the underside and drill four drain holes.
- Aisles- Space boxes 3' apart to form walking aisles.
- Soil- Fill boxes with Mel's special soil mix: 1/3 blended compost, 1/3 peat moss, and 1/3 coarse vermiculite.
- Grid- Make a permanent square foot grid for the top of each box. A MUST! (You can use wood lathe, old blinds, or string to mark a tic-tac-toe type design.)
- Care- NEVER WALK ON YOUR GROWING SOIL. Tend your garden from the aisles.
- Select- Plant a different flower, vegetable, or herb crop in each square foot, using 1, 4, 9, or 16 plants per square foot. If the package says to plant every 12 inches, plant one per square foot, package says 6”, plant 4 per sq foot, package says 4”, plant 9 per sq foot, package says 3”, plant 16 per sq foot.
- Plant- Conserve seeds. Plant only a pinch (2 or 3 seeds) per hole. Place transplants in a slight saucer-shaped depression. Cool crops (lettuce, cabbage, peas) can be planted April to May. Warm crops (beans, tomatoes, pumpkins) can be planted late May to early June. Plant cool crops again in August for a fall harvest.
- Water- Water by hand from a bucket of sun-warmed water.
- Harvest- When you finish harvesting a square foot, add compost and replant it with a new and different crop.
How to build an arch trellis
How to build a nursery system
Following the lead of Square Foot Gardening, we start many plants in vermiculite, and when they have 2 true leaves, transplant to a pot with starter soil medium. Since the early 1990’s we have rolled paper pots, going a step further than what Mel describes on page 152 of the SFG Answer Book.
How to eliminate weeds
Eliminate weeds from growing into your box garden by placing plastic at the base.
Why:
When we eliminate weeds from growing into the box garden, this is what is going to happen:
|


